
How to migrate Next.JS from Vercel to your own VPS on Digital Ocean
I’ve seen many people complaining in twitter about Vercel pricing and how cheap it is to run your own VPS instead of using Vercel. Migrating is quite easy, I’m not a devops engineer and it took me just a few hours to figure it out and automate my whole deployment process, I believe it’s worth investing the time as you will save thousands of dollars potentially.
In this tutorial I’ll show you how to setup Github Actions to automatically deploy to your VPS on every new push to main. The script will deploy the new code, migrate your database and reload the server with a zero downtime.
Creating the Workflow
The first thing is to create a file in your repo for the new workflow, you can do that by creating a file under: .github/workflows/deploy.yml with the following content.
name: Build and Deploy

on:
  push:
    branches:
      - main

  # Add this to allow manual triggering
  workflow_dispatch:
You can give the name you want, just make sure to use something descriptive. You also want to run this workflow on every push to main. Finally, workflow_dispatch allows you to manually run the workflow from the Github Actions UI, sometimes you just want to run the deployment without actually committing anything.
Getting the last code and dependencies
The next step is to create the job that will be running on every push. In here we want to checkout the latest code, install node, install all dependencies with npm (or your favorite package manager) and then run the linter.
name: Build and Deploy

on:
  push:
    branches:
      - main

  # Add this to allow manual triggering
  workflow_dispatch:

jobs:
  build:
    runs-on: ubuntu-latest
    steps:
      - name: Checkout Main Branch
        uses: actions/checkout@v4
        with:
          fetch-depth: 0
          ref: main

      - name: Use Node.js
        uses: actions/setup-node@v4
        with:
          node-version: "18.18.2"

      - name: Install Dependencies
        run: npm install

      - name: Lint
        run: npm run lint
There are a couple of packages we are using in this script:
actions/checkout@v4is a package that checkouts the latest from the main branch.actions/setup-node@v4allows you to setup any version of node, make sure to set the right version for your project.
Building and deploying
Once we have all dependencies ready we can build the project and deploy to our VPS using SSH.
name: Build and Deploy

on:
  push:
    branches:
      - main

  # Add this to allow manual triggering
  workflow_dispatch:

jobs:
  build:
    runs-on: ubuntu-latest
    steps:
      - name: Checkout Main Branch
        uses: actions/checkout@v4
        with:
          fetch-depth: 0
          ref: main

      - name: Use Node.js
        uses: actions/setup-node@v4
        with:
          node-version: "18.18.2"

      - name: Install Dependencies
        run: npm install

      - name: Lint
        run: npm run lint

      - name: Build Website
        run: npm run build
        env:
          DATABASE_URL: ${{ secrets.PROD_DATABASE_URL }}

      - name: Install SSH Key
        uses: shimataro/ssh-key-action@v2
        with:
          key: ${{ secrets.SSH_KEY }}
          known_hosts: "unnecessary"

      - name: Adding Known Hosts
        run: ssh-keyscan -H ${{ secrets.HOST }} >> ~/.ssh/known_hosts

      - name: Deploy with rsync
        run: rsync -avz --delete . ${{ secrets.USERNAME }}@${{ secrets.HOST }}:${{ secrets.TARGET_DIRECTORY }}
To build Next.JS all we need to run is to run this command npm run build, it will build the bundles and everything we need. Make sure to define all environment variables that your app needs, in this example I’m setting the database url, but we can set as many variables as we need.
To set the environment variables for your project in Github, you can go to Settings tab in your project, then Secrets and variables on the side nav, click on the Actions menu. Once in the screen you will see a New repository secret green button, when you click it it will allow you to add a new variable that you can use in your workflows.
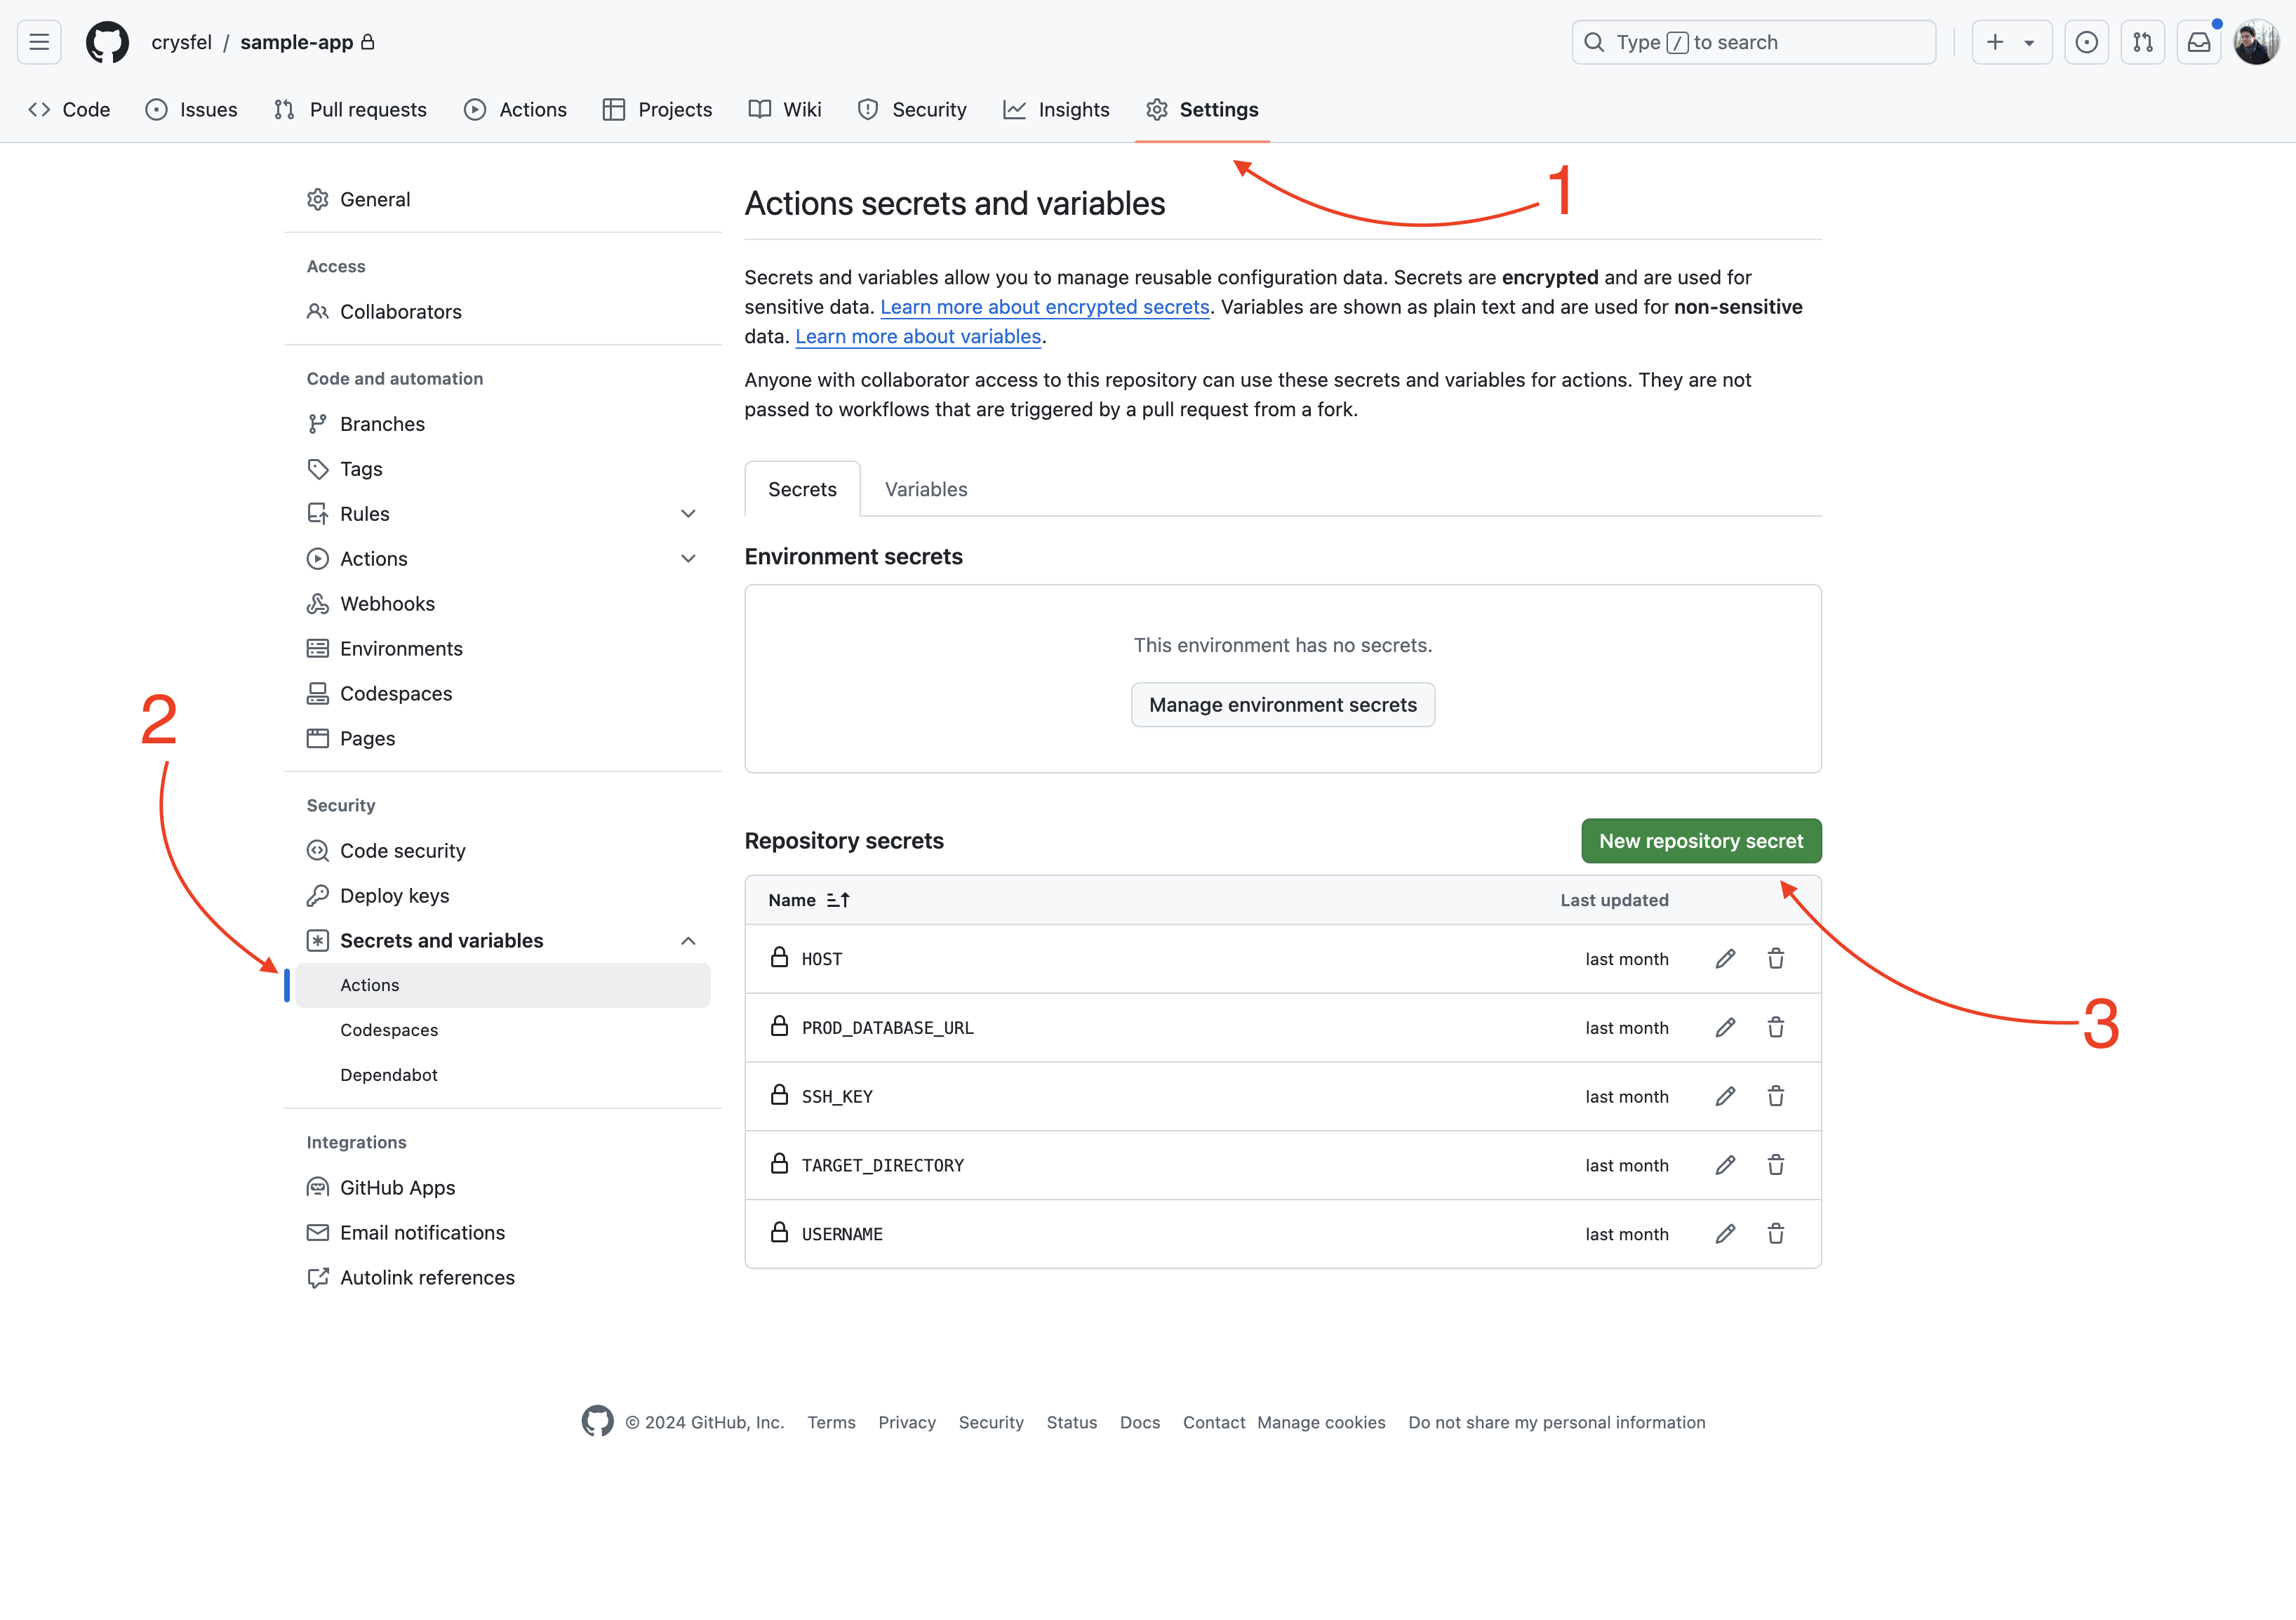
While you are on this screen, make sure to set all the variables you need. We can save in here the secret key to our VPS, the host and the user name.
The next part of the script uses the shimataro/ssh-key-action@v2 package, this will help us to ssh into our VPS, as you can see we are using the secret key from the environment. If you are not sure how to get the ssh key, please follow this tutorial.
Next step is to add our VPS IP to the known hosts list, this way we wont get prompt the first time we try to connect to the VPS. Again, make sure to create the HOST variable with the IP of your VPS in the previous steps.
Finally we deploy our code with rsync, this uses ssh to copy all the files to our VPS, I’m using a TARGET_DIRECTORY variable to set the destination in my VPS. The value of this variable could be something like /var/www/sample.com. We are done deploying our code into our VPS! That was easy right?
Migrating database
Now let’s deal with the database migration, if you don’t have a database you can skip this step. This really depends on what you are using, for this example I’d use Prisma. But you can use anything to manage your migrations.
The migrate job looks like this:
migrate:
    runs-on: ubuntu-latest
    needs: [build]
    steps:
      - name: Run Migrations
        uses: appleboy/ssh-action@v1.0.3
        with:
          host: ${{ secrets.HOST }}
          username: ${{ secrets.USERNAME }}
          key: ${{ secrets.SSH_KEY }}
          script: |
            cd ${{ secrets.TARGET_DIRECTORY }}
            export NVM_DIR="$HOME/.nvm"
            [ -s "$NVM_DIR/nvm.sh" ] && \. "$NVM_DIR/nvm.sh"
            nvm use 18
            DATABASE_URL=${{ secrets.PROD_DATABASE_URL }} npx prisma migrate deploy
We are using appleboy/ssh-action@v1.0.3 to run commands into our VPS directly from our workflow, how cool is that? We need to set the host, username and private key. All of these come from our environment in Github.
- The script that we are going to run basically open the deployment directory where all the new code is located.
- Because I’m using
nvmto manage the node versions in my VPS, I need to set the right version before running the migrations. If you don’t use nvm you can skip this step. - Finally I use the prisma commands to migrate my database, it’s important to mention that I’m setting the
DATABASE_URLenvironment variable before running the migrations, this way the prisma cli will be able to connect to my database.
As I said, I’m using prisma in this example, but you can use Drizzle or any other tool to manage your database. You will only need to update the line were we run the migrations.
Zero downtime deployments
PM2 allows you to deploy with zero downtime deployments, once we have the code and migrations ready, we can reload the server and it will pick up the new code. Here’s the job to do the reloading:
reload:
    runs-on: ubuntu-latest
    needs: [migrate]
    steps:
      - name: Reload remote application
        uses: appleboy/ssh-action@v1.0.3
        with:
          host: ${{ secrets.HOST }}
          username: ${{ secrets.USERNAME }}
          key: ${{ secrets.SSH_KEY }}
          script: |
            cd ${{ secrets.TARGET_DIRECTORY }}
            export NVM_DIR="$HOME/.nvm"
            [ -s "$NVM_DIR/nvm.sh" ] && \. "$NVM_DIR/nvm.sh"
            nvm use 18
            cp ../config/ecosystem.prod.config.cjs ecosystem.config.cjs
            pm2 reload ecosystem.config.cjs --update-env
Again we are using connecting to our VPS using SSH and running a few commands.
- First open the deployment directory where our code is.
- Load the right version of node using nvm.
- Copy your ecosystem config to the app directory.
- Reload pm2 with a simple command.
One thing to comment in here is about the ecosystem config, this is a PM2 configuration file where we can set the name of the app, environment variables and other things. We could potentially create this file on the fly using the secret values we have in Github, but I was lazy and just have a copy of my secrets in this file.
That’s it folks! Now we should have an automated deployment pipeline! We can code, commit, push and our production server will have the latest changes in a few minutes serving our users! Everything is automated now.
Here’s the whole workflow file:
name: Build and Deploy

on:
  push:
    branches:
      - main

  # Add this to allow manual triggering
  workflow_dispatch:

jobs:
  build:
    runs-on: ubuntu-latest
    steps:
      - name: Checkout Main Branch
        uses: actions/checkout@v4
        with:
          fetch-depth: 0
          ref: main

      - name: Use Node.js
        uses: actions/setup-node@v4
        with:
          node-version: "18.18.2"

      - name: Install Dependencies
        run: npm install

      - name: Lint
        run: npm run lint

      - name: Generate Prisma Client
        run: npx prisma generate
        env:
          DATABASE_URL: ${{ secrets.PROD_DATABASE_URL }}

      - name: Build Website
        run: npm run build
        env:
          DATABASE_URL: ${{ secrets.PROD_DATABASE_URL }}

      - name: Install SSH Key
        uses: shimataro/ssh-key-action@v2
        with:
          key: ${{ secrets.SSH_KEY }}
          known_hosts: "unnecessary"

      - name: Adding Known Hosts
        run: ssh-keyscan -H ${{ secrets.HOST }} >> ~/.ssh/known_hosts

      - name: Deploy with rsync
        run: rsync -avz --delete . ${{ secrets.USERNAME }}@${{ secrets.HOST }}:${{ secrets.TARGET_DIRECTORY }}

  migrate:
    runs-on: ubuntu-latest
    needs: [build]
    steps:
      - name: Run Migrations
        uses: appleboy/ssh-action@v1.0.3
        with:
          host: ${{ secrets.HOST }}
          username: ${{ secrets.USERNAME }}
          key: ${{ secrets.SSH_KEY }}
          script: |
            cd ${{ secrets.TARGET_DIRECTORY }}
            export NVM_DIR="$HOME/.nvm"
            [ -s "$NVM_DIR/nvm.sh" ] && \. "$NVM_DIR/nvm.sh"
            nvm use 18
            DATABASE_URL=${{ secrets.PROD_DATABASE_URL }} npx prisma migrate deploy

  reload:
    runs-on: ubuntu-latest
    needs: [migrate]
    steps:
      - name: Reload remote application
        uses: appleboy/ssh-action@v1.0.3
        with:
          host: ${{ secrets.HOST }}
          username: ${{ secrets.USERNAME }}
          key: ${{ secrets.SSH_KEY }}
          script: |
            cd ${{ secrets.TARGET_DIRECTORY }}
            export NVM_DIR="$HOME/.nvm"
            [ -s "$NVM_DIR/nvm.sh" ] && \. "$NVM_DIR/nvm.sh"
            nvm use 18
            cp ../config/ecosystem.prod.config.cjs ecosystem.config.cjs
            pm2 reload ecosystem.config.cjs --update-env
Happy coding!
Did you like this post?
If you enjoyed this post or learned something new, make sure to subscribe to our newsletter! We will let you know when a new post gets published!